
Anatomy of a Sensory Bin
- beelievepediatric
- Apr 22, 2021
- 4 min read
Updated: Apr 10, 2024
Sensory bins can be valuable learning and exploration tools that the whole family can create and play with together! They can be used a variety of ways to help your child BEE the best they can BEE. Let's take a look at how our Occupational Therapists build and utilize sensory bins.
Building a Sensory Bin

1: Bin- Plastic shoe-box sized storage bins are perfect- ideally, one that latches or locks closed. The best size we have found that we continue to use in our clinic is 5 quarts with a latching lid, the newest one (featured here) also has a removable tray perfect for storing tools!
2: Base- Almost anything is a great base for your bin and you can mix and match for a variety of textures or colors! Rice, dry beans, cotton balls, uncooked pasta, sand, or rocks are all great options! We recommend a dry base if you plan on keeping your bin for a while and reusing it; if you use a wet base, it can be a ton of fun, but it does need to be emptied after use. Some wet base ideas are water beads, cooked pasta, shaving cream, or "clean" mud.
2.1: Dying your Base- You can use food coloring to dye the base of your bin to add color and stimulate the visual sense! To dye your base, put it in a Ziploc bag with food coloring and either vinegar (for rice) or rubbing alcohol (for beans, to wash off the waxy coating from the skin) and shake! After your base reaches the desired color, spread it out on paper towels and let dry completely before putting it in your bin.
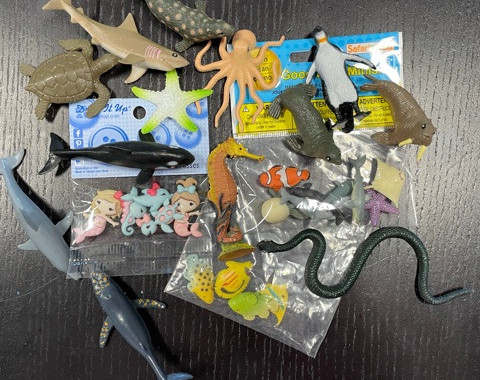
3: Objects- These are small toys or manipulatives and they add fun and size differentiation to your bin! We have used holiday erasers, beads, rubber animals, plastic coins, Easter eggs, cars, holiday decorations, buttons, the list can really go on forever! One great place we find these items is in the party favor section or the holiday aisles at the dollar store.
4: Texture- A good sensory bin has a variety of textures to stimulate the tactile sense, so including things like pom poms, cotton balls, rocks, or felt shapes is highly encouraged! We always try to incorporate at least 2 different textures in addition to the base texture.
5: Letters or Numbers- One element we almost always include is letters or numbers. This helps with visual recognition and can be a great item to find during sensory bin activities. You can include magnetic, felt, or poster letters or you can simply write letters on the manipulatives in your bin!
6: Tools- Using tools to interact with the sensory bin is a great way to work on fine motor skills, making the bin more functional. Including tongs, spoons, tweezers, and bubble tongs help to develop hand strength, grasping patterns, improve utensil use, and kindergarten skills like cutting.


Bonus: Theme- Making themed bins is not necessary, but it adds an additional learning opportunity and another element of fun! Creating holiday themed bins is probably the easiest route, but we have also made space, construction, summer, dinosaur, superhero, and ocean bins, just to name a few- the themes are only limited by what you can find to fill them with! This gives you a great opportunity to teach your children about a topic while working on fine motor skills and conversation skills.


Sensory Bin Activities Promote
Visual Scanning- Can they find a certain letter, number, or color in the competing background of the bin?
Bilateral Coordination- Can they hold a bowl with one hand and use a tool to fill it with rice or pom poms with the other?
Grasping Patterns- Holding the tongs or tweezers like a pencil to pick up manipulatives develops the hand strength and grasping patterns necessary for handwriting.
Activities of Daily Living (ADLs)- Using spoons to scoop items in the bin helps with utensil use and hand-eye coordination.
Sensory Bin Maintenance

Depending on how often your sensory bin gets used, we recommend cleaning your sensory bin at home about every 3 weeks. Food items like rice and beans should be thrown away and replaced. Some nonperishable items like the toys and tools can be cleaned with disinfectant if they're still in good condition, other items like pom poms that can absorb germs should also be thrown away and replaced.
If you use a wet base, you won't get as much longevity out of your bin. Food items, like cooked pasta, should only be used once before it is replaced and the objects inside cleaned. If you use water beads, they'll last a bit longer, but it's a moist environment that can also hold on to and breed a lot of germs, so weekly replacement and cleaning would be best.

Alternatives to Sensory Bins
If you don't have space for a sensory bin or if you want to take a travel sensory toy on a vacation, another great option is making sensory bottles or balloons! These are great to help with anxiety on car rides and strengthen emotional regulation while squeezing a balloon or watching a sensory bottle. You can use rice, beans, or flour to fill a balloon a tie it tight so the kiddos can squeeze, squish, and pull the balloon to relieve stress and build hand strength. Sensory bottles can also have the same materials as a sensory bin, or you can make calming bottles with water, glitter, and clear glue. Be sure to use LocTite to seal the lids of your bottles or you might have a sensory bin in your floorboard!

We would love to hear about your sensory bin creations and what some of your kiddo's favorite themes or sensory items are! Share with us in the comments below!